|
More than a year has gone by since I started learning to make soap. It all started with excess milk from my goats, and suggestions from friends and family. What I didn't realize one year (15 months) and 42 batches of soap ago, is that soap making is addictive. Maybe its because the possibilities are endless in formulas, scents, swirls, colors and shapes. Maybe its because each batch is another lesson, a little something is learned making you want to try again to perfect your technique and apply something new. While I love using my soap and giving it away as gifts, I've also come to realize that if I want to keep making it, I also need to sell a few because 1) I can't use it all 2) there isn't enough room in my closet to store it all and 3) soap making supplies are expensive! I have also learned, there are a lot of soap makers out there. To differentiate Tangle Ridge Farm, I'm trying to find my 'niche' and continue to focus on using as many all natural ingredients as possible. I use only natural colorants, mostly clays, and (with a few exceptions of customer favorites), use only essential oils for fragrance. My soap contains milk from my goats. The beauty of this is I can freeze extra milk in the summer and have it available to use all year round. Over the past few weeks, a lot of soap making has occurred. Its a great way to spend time on cold rainy weekends when the days are short and there isn't much outside work that an be done. Using what I have learned over these past months, both from experience and research, I have put together what I hope are some new and improved formulas with a better look and larger bars. 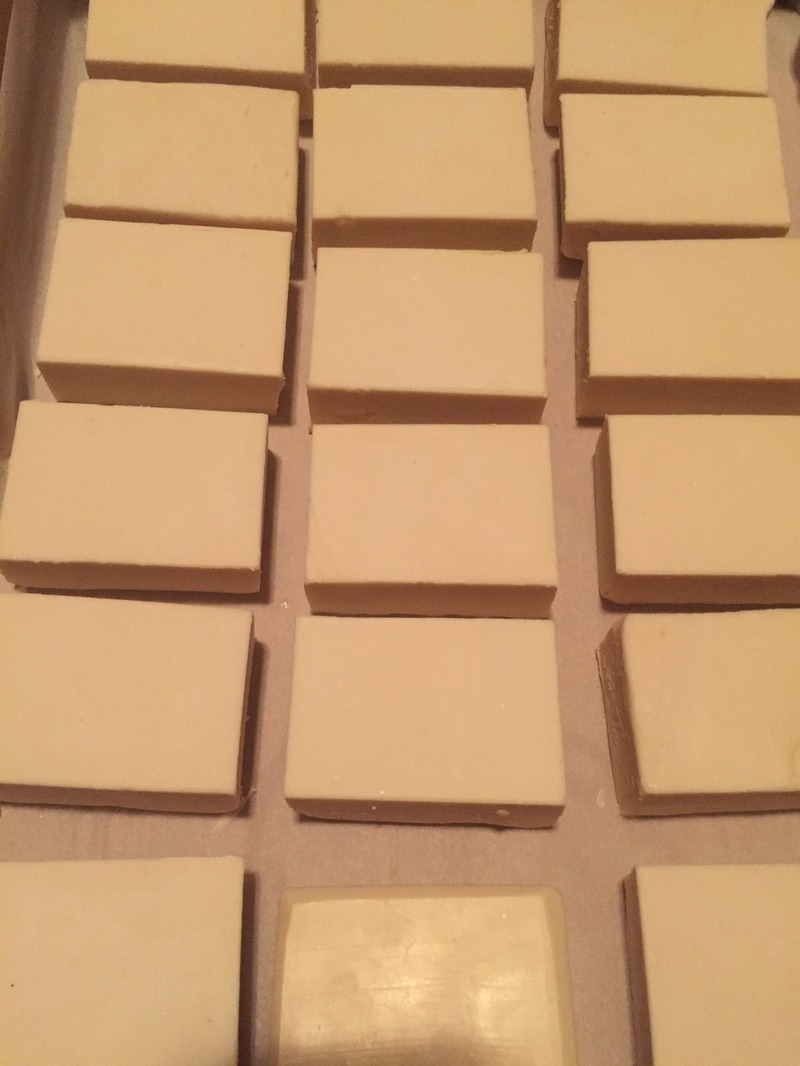 Lavender - This is a large, solid white bar scented only with Lavender essential oil. The formula used is expected to be very bubbly and conditioning. It contains goat milk coconut oil, palm oil, olive oil and castor oil. It was made on 11/19/16, and is essentially ready now as soon as I prepare it. I found a new mold and I LOVE that makes large thick bars, easy to cut and helps prevent the dreaded 'center gelling' effect that some of my earlier soaps would do in the loaf mold. The center gel doesn't hurt the quality of the bar, but I didn't like to darker color it made in the center. One of the tricky parts about using milk in soap is the sugar in the milk reacts with the lye to heat up and, even with preventative measures, can cause this reaction to occur. Certain additives and essential oils will cause it to heat up as well. This mold increases the surface area of the soap and helps to reduce the effects of the heat. 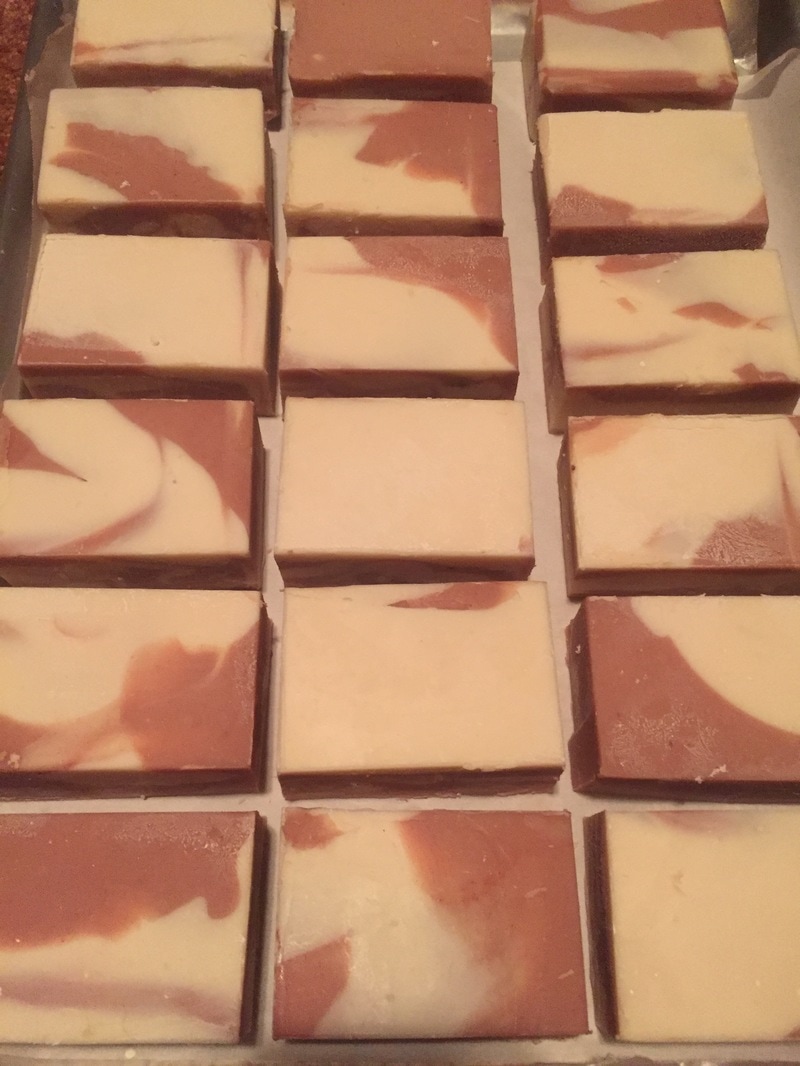 Fruit and Flowers - Honeysuckle A repeat and slight modification of a favorite scent. I was on a quest for bubbles, and this one will have it. It contains goat milk Palm kernel oil, Lard, Sunflower oil, Shea butter and castor oil. Rose clay gives it the pink color, and scents are Honeysuckle fragrance oil and orange essential oil. Formulated on 12/1/16. 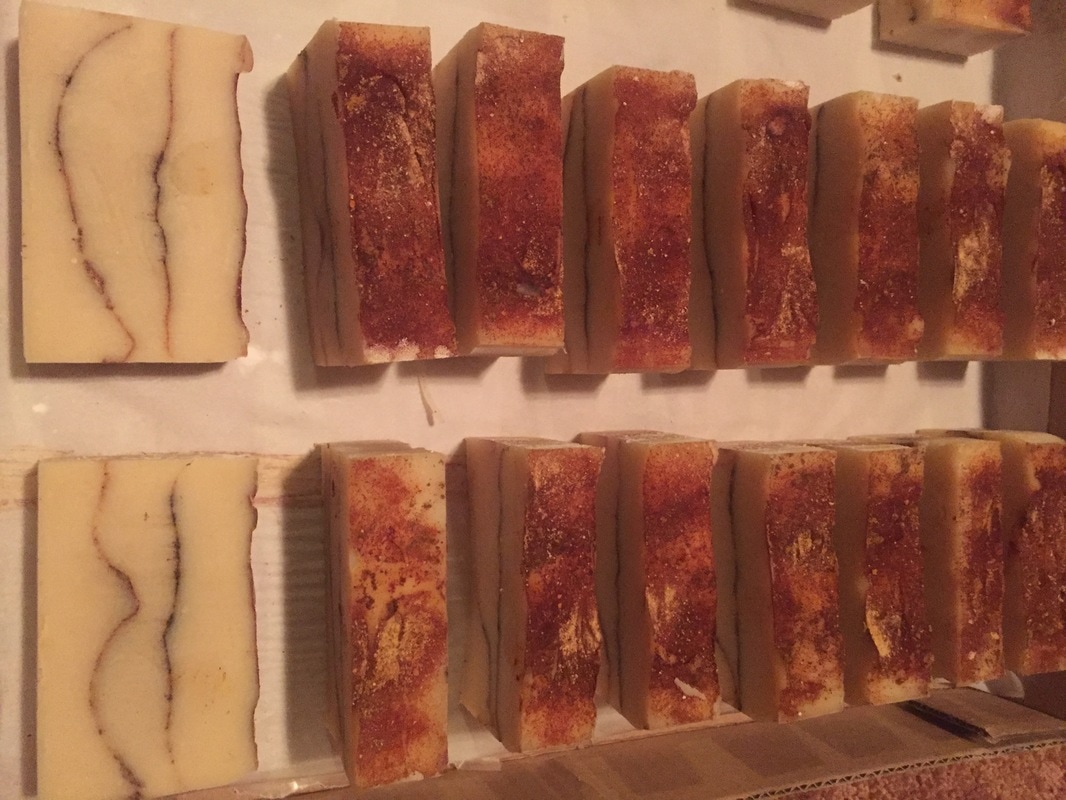 Sugar and Spice Another bubbly and creamy formula containing goat milk Lard, Palm kernel oil, coconut oil, castor oil, sunflower oil, olive oil, and cocoa butter. It is scented with cinnamon essential oil and white tea and ginger fragrance oil. A fine layer in the center and on the top of cinnamon, turmeric and ginger spice gives it a little color and exfoliation. Created on 12/3/2016 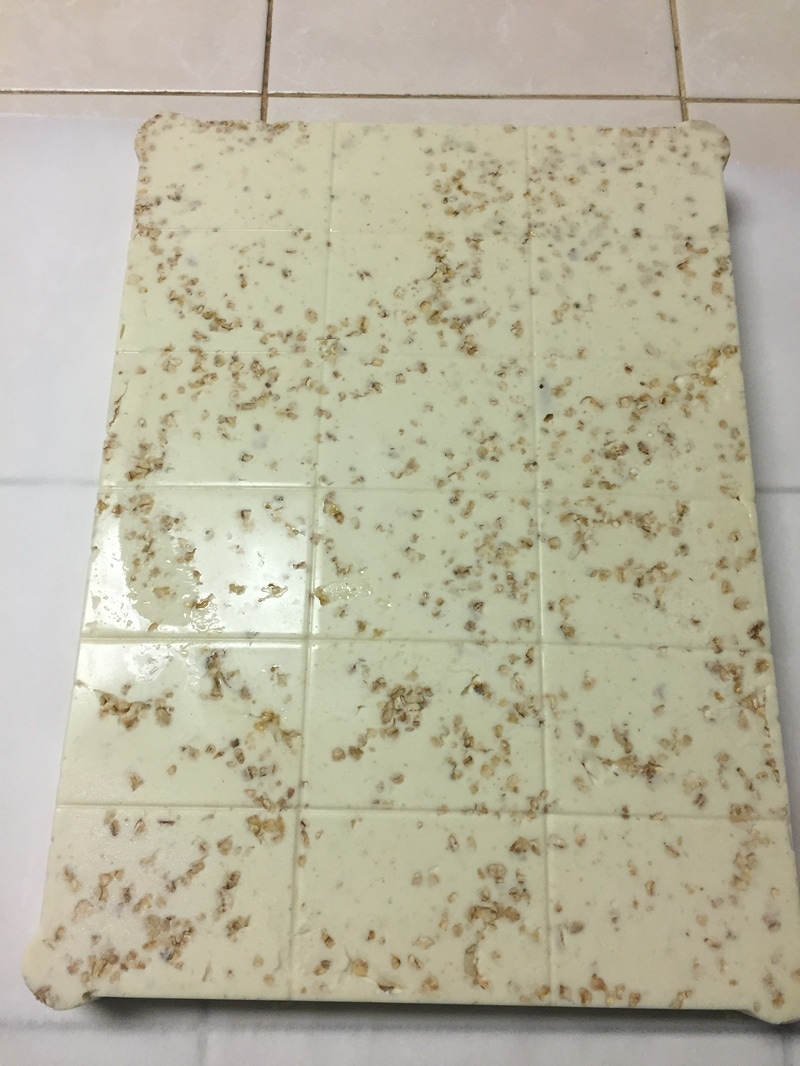 Oatmeal, milk and honey - I have attempted this one several times, and this is definitely the best yet. This will be a mildly cleansing and highly conditioning bar. It contains local honey and ground oats, along with oats and honey fragrance oil. Oils used were Shea butter, cocoa butter, rice bran oil, olive oil, palm kernel oil, coconut oil, avocado oil and castor oil, along with of course goat milk. Made on 12/22/2016  Mint Coffee soap Another repeat favorite and definitely an improvement over previous batches. This is a PALM FREE formula for those who prefer to avoid palm oil. I also want to protect the rain forest, so when I buy palm oil it is always from a certified sustainable source. This recipe contains goat milk , Olive oil, Babassu oil, cocoa butter, avocado oil, sunflower oil, mango seed butter and castor oil. Additives include coffee grounds for exfoliation, ground natural vanilla bean and spearmint essential oil. 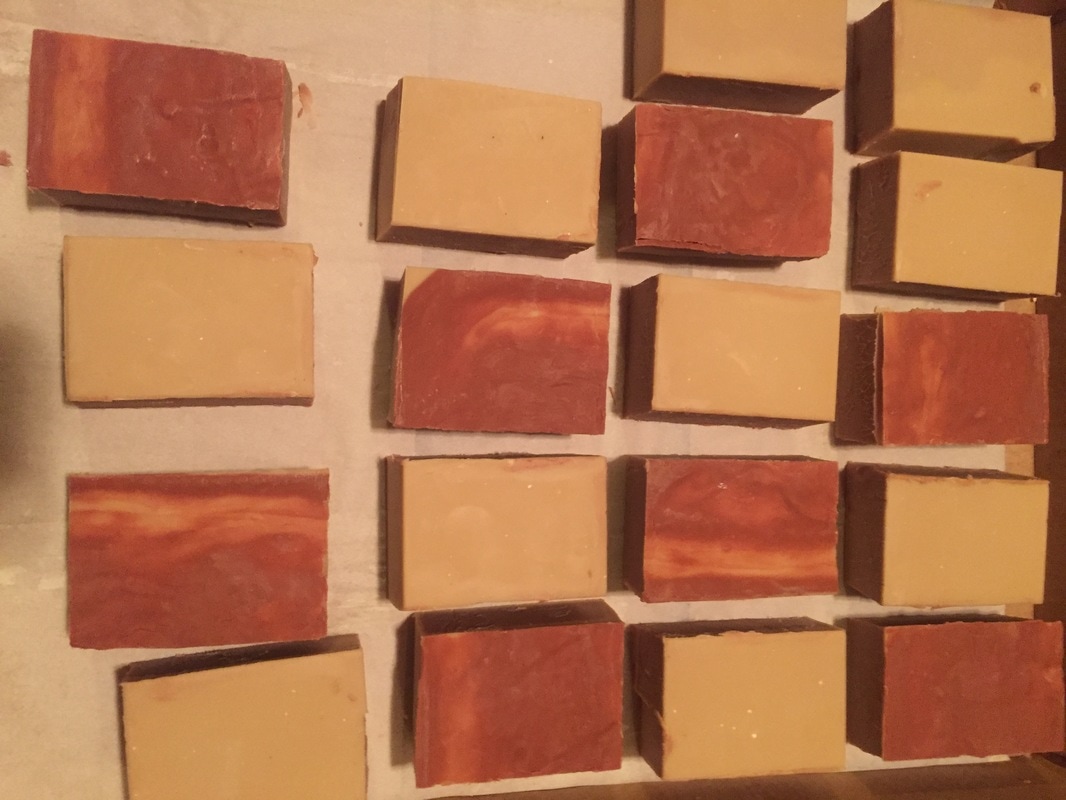 Merlot The only soap I have ever made that does not contain goat's milk. I almost feel like I cheated somehow by leaving my girls out on this one. This soap contains reduced Merlot wine, coconut oil, palm oil, sunflower oil, olive oil, shea butter and castor oil. a top layer containing rose clay was added for accent, and scented with Berrywine fragrance oil. Made on 12/18/2016. 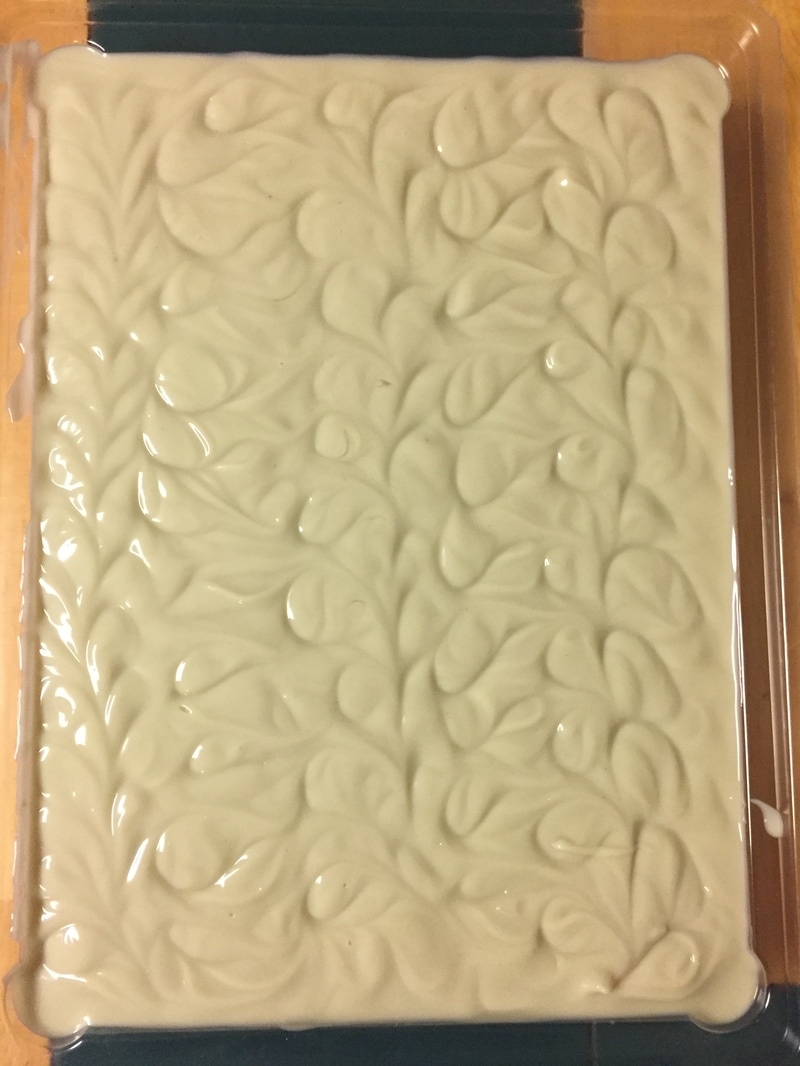 Manly A simple, palm free formula that will be a hard bar with lots of bubbles. It contains goat milk, lard, coconut oil, and castor oil. Tinted with French green clay, and scented with manly fragrances of cedarwood, anise and rosemary essential oils. I think this one will be a new favorite. (12/30/2016) Conditioning - no name yet I haven't put a name on this one yet, but it is highly conditioning formula and palm free. I also attempted a swirl in my loaf mold. This soap contains a high percentage of Lard, along with olive oil cocoa butter, mango butter and castor oil. Colors include Moroccan clay, titanium dioxide, and activated charcoal. It is scented with lemongrass, lavender and cedarwood essential oils. (12/23/2016) 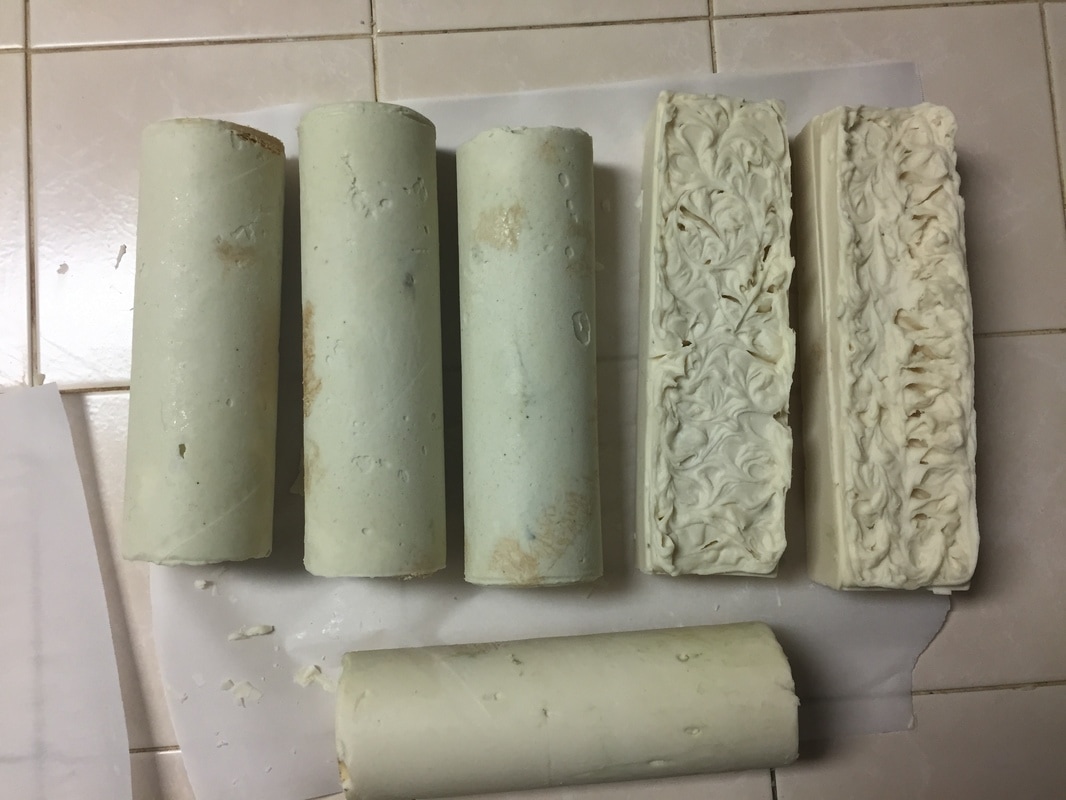 Bastille Luffa High in olive oil, with coconut and castor added for hardness and bubbles. Inside each is a luffa sponge grown here at Tangle Ridge Farm. One batch is tinted green with French green clay and scented with pine and lime essential oils, and the other contains kaolin clay and is scented with island coconut fragrance oil. (12/27/2016). Due to the high olive oil content, it will require a longer curing time to harden.  Chamomile
Another palm free recipe that will be mildly cleansing and bubbly, with chamomile flowers for exfoliation. It contains goat milk, coconut oil, avocado oil, rice bran oil, babassu oil, and sweet almond oil, Scents include tea tree and lavender essential oils (1/1/2017) The next one I want to make is BEER soap! I'm anxiously awaiting some kootie brown craft beer to get started.
0 Comments
Its that time of year again, Science Fair. While I would not consider Connor or myself mad scientists, or even lab rats, we have learned a few things about using a microscope to examine livestock feces. I wanted to share our experiment and results because it may be of interest to my fellow goat lovers. Last year we conducted a similar experiment with sheep, 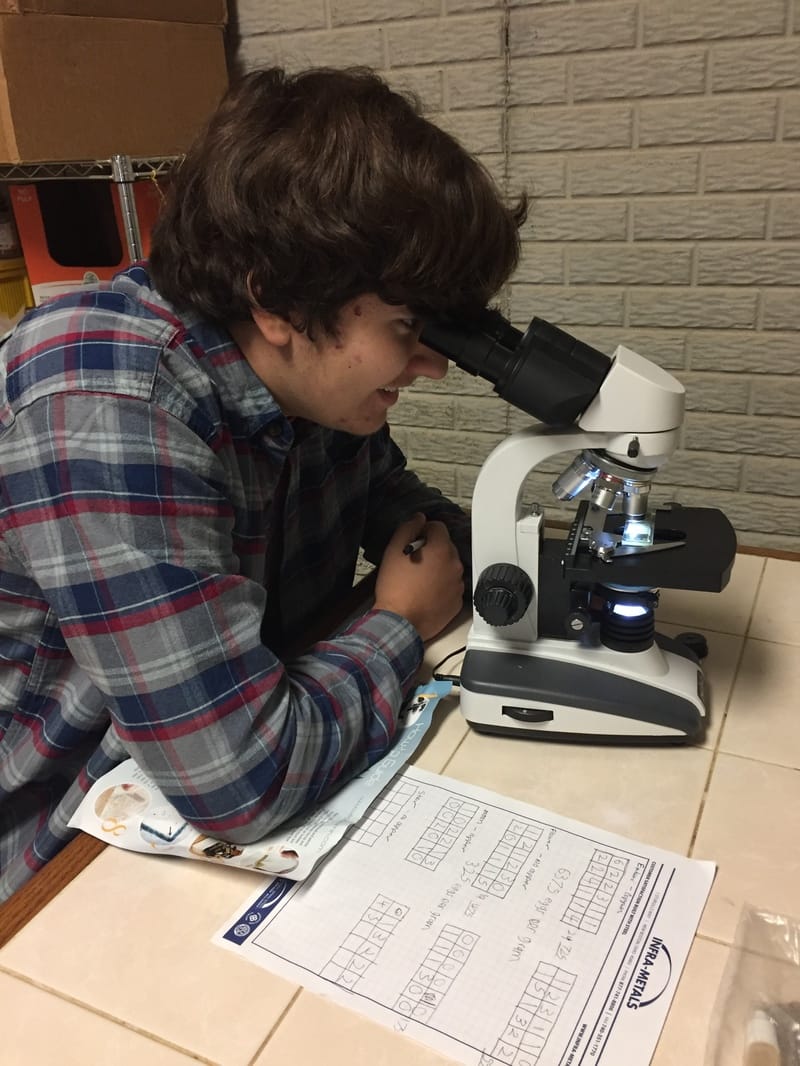 Our hypothesis was: If copper bolus treatment is given to goats, then their fecal egg counts will decrease. We conducted the test in two steps. First, we randomly selected 4 goats to recieve Copper Oxide Wire Particle bolus and 4 who would not recieve copper or any other medication. We used the recommended dosage of 4 Gm/ 100 pounds, and administered using a bolus injector to the back of the throat then held their mouth closed and encouraged swallowing. At the same time, we conducted a FAMACHA examination of their eyelids, and obtained a fecal sample from each goat. We prepared our samples and viewed each under the microscope, counting eggs and documenting each carefully. We prepared two slides for each goat sample and took an average of the two as our final result. Two weeks later, we repeated the examinations and compared our results. The goats in the control group were administered COWP this time for good measure.
Our results were as follows: Each goat who recieved COWP with the initial testing had a reduction in fecal egg count two weeks later. Goat 1 - 37.3 % reduction Goat 2 - 2.44% reduction Goat 3 - 82.6% reduction Goat 4 - 24.14% reduction Average reduction - 35% Goats who did not recieve COWP initially, two had an increase in Fecal egg count, and two had very minimal reductions in fecal egg count. While this is not earth shattering information, it confirms the benefits and importance of Copper in the health of goats, and reinforces to me the importance of maintaining a regular treatment schedule for copper. Keep in mind this test was conducted in November when goats are off pasture and typically have lower worm loads due to eating hay and not browse. All of their FAMACHA scores were within a 2 - 3 range, and no one was denied a necessary treatment. His Abstract gives the Readers Digest version for those who are interested: "Haemonchus contortus, barber pole worm, is the main concern of many goat producers. Management through anthelmintics has become marginal due to parasitic resistance to most common dewormers used throughout the United States today. Additional methods, including copper oxide wire particles, or COWP, have proven to be highly effective in reducing worm counts of small ruminants. The U.S. department of Agriculture found that ingested COWP particles are a way to control barber pole worms. They found that doses as low as ½ gram reduced nematodes b 60-90% for at least four weeks. The exact mechanism of COWP is not fully understood. Researchers believe copper has a direct effect on the internal parasites. It may also help to boost the immune system of the animal. Many goat producers in the southern Ohio area struggle with internal parasites and finding the best treatment. This experiment was conducted to see if the copper bolus treatment method is effective. It is believed that if a sample of goats is given copper, then their fecal egg count would decrease more than those of goats that had not been treated with anything. Using the McMaster FEC method and standard equipment, tests shall determine substantial reduction in fecal egg counts in treated animals. After testing, it was determined treated animals showed a 35% average reduction in fecal egg count. In conclusion, the hypothesis was confirmed and copper oxide particles contribute to a reduction in fecal egg count. The results of this experiment can be applied to responsible care and management of goats. Along with other preventative measures, goat keepers may safely utilize COWP in prescribed amounts on a regular basis to assist in the control of barber pole worm." 2016 was a different kind of year. While there were many things we wanted to accomplish, it seemed to move slowly, with much waiting and re-prioritizing. Early in the spring, we realized the woods had been attacked by the Emerald Ash bore, a nasty bug that was killing the ash trees, and we have a lot of ash trees. The decision was made to hire a logging company to remove several sections of trees and do some land clearing. We hoped to gain a small income from the sale of the trees to finally build a barn. Several companies were interveiwed and toured through the woods, and finally one was selected, and a contract signed. Work was supposed to be completed in July. Meanwhile, all the things i wanted to do were on hold. July became August, and August September. Finally, the logger called to say he would not be able to do the job. It was September, and the contract expired at the end of October. All the time and effort of marking boundaries, selecting trees to take and trees to keep, and the waiting, delaying progress added up to a big frustration. After a few days of gnashing of teeth over a complete change in the direction of the farm, we regrouped and made a new plan. Meanwhile, the summer was ending, and winter right around the corner leaving not much time to get things done. One of the biggest events and change of direction was saying goodbye to the sheep. I still miss them, but I think it was the right thing for us. They were awesome, but I have to admit, life has been a little less stressful without them. 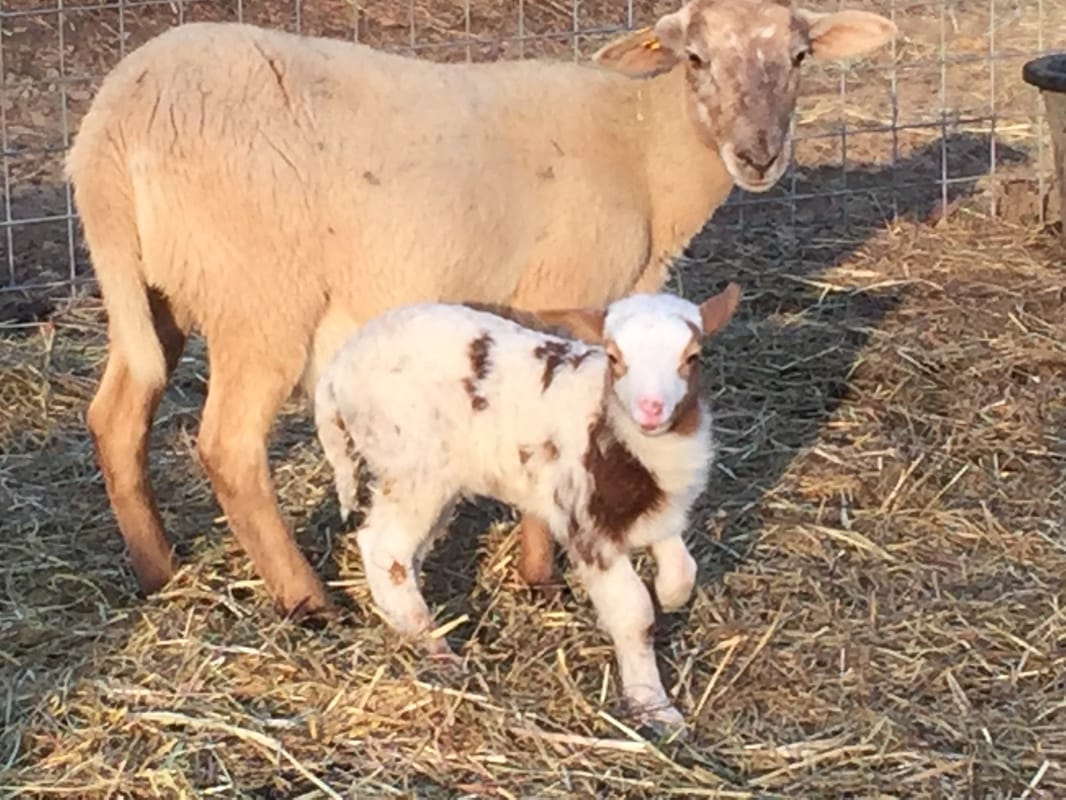 My baby girl graduated from Marshall University with her undergraduate degree in Communication Disorders. I am a proud Mama, and she is off the the next chapter in her life, learning to be a grown up and doing great.  We had some babies Ember gave us two little goat kids, and Mama kitty had four kittens in John's closet. We raised and released some quail, raised some chicks, and even hatched a few of our own. And, we raised a garden. The garlic crop was moderately successful. As with anything, there's a learning curve, and even steeper when you try to go organic. We learned this year about the onion worm. Nasty things they are. A new and larger crop was planted in the fall with preventataive measures put into place. Luffa, on the other hand, is quite easy and was a big hit. And, we did manage to build a few things A new chicken coop to make room for more chickens and goats, a deck on the back of the house, and a lean to shed added onto the pole barn. And, a lot of soap was created. I can't wait to show you what's coming for 2017 I guess we accomplished a few things after all.
Happy New Year! See you on the other side. The breeding plan for this year is pretty simple. We had one guy for the job, Daryl: LuvEmAll Acres -Daryl (Purebred) He is a gorgeous guy full of sweet personality and excellent breeding, but not the most cooperative to my poor photography. This is his first time as the 'man of the family' and he took his job very seriously. Creamer's Alita, F1 Due March 7, 2017 Alita is an easy kidder, easy milker, and even walks great on a lead. This will be her fourth kidding season. She has given me three does and three bucks over the past few years. I have all three of her daughters, and one son as a wether who is pictured with Daryl. Heartbreak Kidz Princess Flower (Purebred) Due March 15, 2017 Born in 2015, this will be Flower's first kidding. I am very excited for these babies. Flower was 2016 Reserve Champion Dairy Goat at the Lawrence County Fair TangleRidgeFarm Starlight (F2) TangleRidgeFarm Moonbeam (F2) Due March 14 - March 21, 2017 Twin daughters of Alita, born here on TRF. Star is tiny and full of personality. Moon is the larger of the two with a little more drop in her ears, and a little shy. Both of these girls will be first fresheners. TangleRidgeFarm Sasha, (F1) Due March 21 - March 31, 2017 Sasha is the daughter of YellowGoatFarm Ember, my full blooded Nubian, which makes her 75/25 mini. She is regal and elegant, with great conformation and beautiful nubian ears. All of my goats are G6 Negative both by testing and parentage, and tested negative in 2016 for CAE, Johne's and CL.
They are vaccinated annually and recieve regular mineral supplements, hoof trimmings and fecal examination followed by treatment as needed for parasites. If all goes well, we will have several kids available in the Spring of 2017. 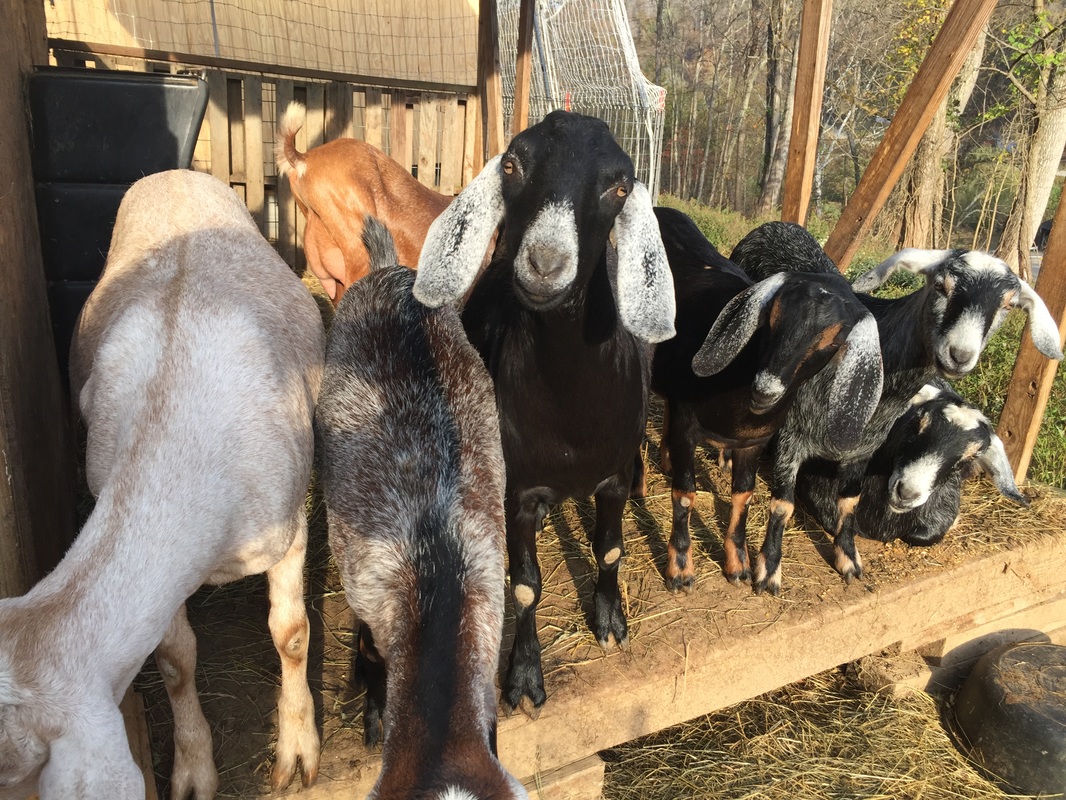 Not long a go, a friend had a sick goat. She called me up, and we made our best guesses on a diagnoses and treated him accordingly. By luck or miracle, he lived and is back to health today. It seemed to her that I had an arsenal of goat health supplies in my garage, so she asked me for a list of things to have on hand in case of a goat emergency. One thing I know for certain, is when a goat starts looking sick, it is usually an emergency. They go down quickly and often if treatment isn't started immediately, its too late. You don't always have time to run to the store, and it is never a good idea to go to bed and 'wait and see' until morning if they get better. What you will find is usually a dead goat.
My disclaimer for this post is, I am NOT a vet. I am just a person who has raised goats (and sheep) for a few years and learned from my experience, and most importantly my mistakes. This is not intended to tell you how to treat every illness you may encounter. This is just a list of things that are 'good to have'. It is not an all inclusive list, because you or others may find things useful that are not on this list. The reasons for having most items are self explanatory, but for others would take a lengthy explanation. Chances are, if you have goats very long you will end up needing most of the things on this list, plus a few more. Goat keeping, like anything else, is an art. Many have their own philosophies regarding medications, vaccines and natural herbs, etc. I recommend researching and then figuring out what works best for you and your goats. You don't have to start out with everything on this list, but find that you add to your supplies as you need them. Basic supplies: Goat stanchion or milking stand (helps hold them while trimming hooves, giving vaccinations, etc.) If you don't have or need one, a second person and a lead rope will do. Hoof trimmer styptic powder Digital thermometer Drench gun Goat minerals (loose) and salt Baking soda (sodium bicarbonate) TUMS Pepto bismol Probiotics Vetericyn wound spray Molasses Apple cider vinegar Vaccines and medications (some may be at local farm store or ordered online, some require vet prescription) CD&T Vaccine (annual) C&D antitoxin B Complex injectable Copasure bolus - copper oxide wire particles. 2 gm for 25 pounds, 4 gm for 100 pounds Selenium + Vitamin E - Gel or BO-SE inj (vet prescription) Agricillin - (vet prescription after 2017) Coccidia treatment and prevention Options - Toltrazuril (Baycox) from Horse prerace.com. Do not use on meat goats Di-Methox (Sulfadimethoxine) or Corid Dewormer - this is a very important and lengthy topic that will not be discussed in this post. If you are new to goats, I recommend researching barber pole worm (Haemonchus contortus) ASAP and learn as much as you can about it. It is the most common killer of sheep and goats. Dewormers include Ivomec, Cydectin Levamazone (prohibit) and Valbazen. (do not give to pregnant does). I do not recommend using safeguard as most worms are resistant due to its over usage. Banamine for fever and pain 3 cc and 10 cc syringes and needles Pregnant does: Calcium gluconate or calcium drench Propylene glycol food grade or molasses Lubricating jelly Rubber gloves betadine Old towels It sounds like a lot, and I'm sure I have forgotten some and there are things I don't know I need yet. But, its a pretty good start, and I hope you find it helpful. This is the third year of my experience planting garlic. It all started very small, when the mother of a friend gave me some cloves of Elephant Garlic, which is actually a leek and not a true garlic. They grew beautifully, and made me want to do more. The following year, I did a little research and ordered some hardneck garlic from a mail order site. About 200 cloves were planted. The next year, I added a few more pounds and planted about 700 cloves. Many of the bulbs grew very large, but much to my dismay, we were attacked by the onion maggot, which is a common parasite to garlic and comes from a fly. As a result, I lost about 25% of my crop. This time, I'm trying again and going for aggressive prevention. Soil preparation - The garlic plot has been moved to the garden spot. Rotation of garlic planting sites is important, especially if they've been discovered by the onion maggot. First, pulled up all the remaining plants from the summer, and burned off the grass and weeds. Next, some compost was added and tilled into the soil. Soil testing revealed pH - 7.0, Nitrogen - Low, phosphorus - Medium, Potassium - high. Meanwhile, bulbs were separated for planting. I saved some of the best bulbs from last year's crop, and purchased additional from two regional garlic growers. While I did not count every clove, I am estimating about 2500 cloves to be planted in total. From Mad River Garlic Growers in Ohio: Ischium Red - 13 pounds, Polish white - 1 pound, Nootra rose - 1 pound, Siberian - 1.4 pounds, Killarney Rocambole - 1 pound, Armenian - 1.5 pounds, Magestic Porcelain - 1.5 pounds, Russian White - 5 pounds, Goargian Crystal - 2 pounds From Tangle Ridge Farm: Georgian Crystal - 1 pound, Chesnok Red - 7 pounds, German White - 6.5 pounds, Elephant - 2.5 From Salt River Garlic in Kentucky: (still pending) Music - 10 pounds, Khabar - 5 pounds, Bavarian Purple - 5 pounds 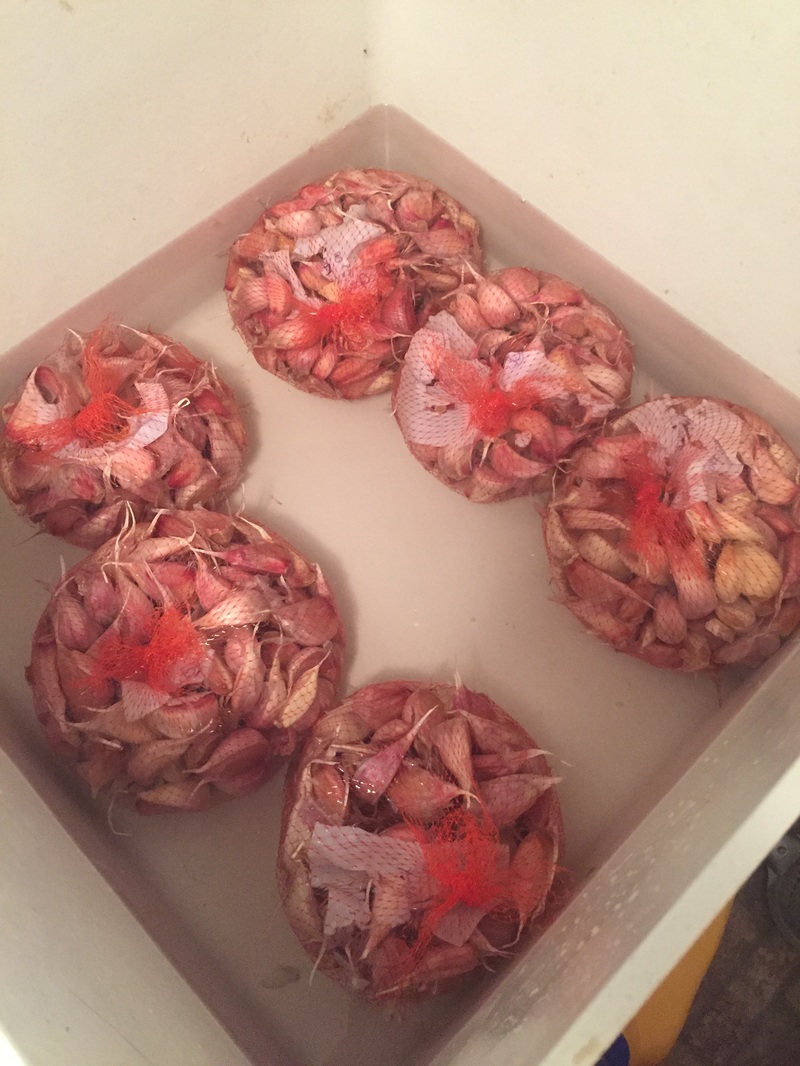 Clove preparation - Based on my limited experience and research and advice from garlic growers, I used the following steps to prepare the cloves for planting: Varieties were separated into mesh bags and identified with colored strings to help keep them straight. Warm water soak - Cloves were soaked in a warm water bath. First, warm water from the tap was ran into a large sink until the cloves were covered. This brought them to about 108 - 110 degrees. I allowed them to soak for about 10 - 15 minutes for a gradual increase in temperature. The water was drained, and another tub of hot water filled with a temperature to about 115 - 117 degrees. I allowed the cloves to soak at this temperature for about 30 minutes. As the water cooled, I warmed it up again with hot water to keep a steady temperature. The warm water kills microorganisms without harming the clove. Alcohol soak - The cloves were then bathed in a bucket filled with 70% isopropyl alcohol for 5 - 10 minutes. . Cheap vodka is also a good choice. The alcohol further sterilizes the cloves. This step is often done last, after the next step discussed, but since I was doing small batches and using the alcohol more than once, I wanted to keep it as clean as possible for repeated batches. Fish Emulsion and baking soda - The cloves were place in an overnight soak of fish emulsion (1/3 cup per gallon) and baking soda (1 tablespoon per gallon). Root Maximizer - Micronized mycorrhizal Inoculant (beneficial fungi) - the final step added this year was a dusting in root maximizer powder immediately before planting. 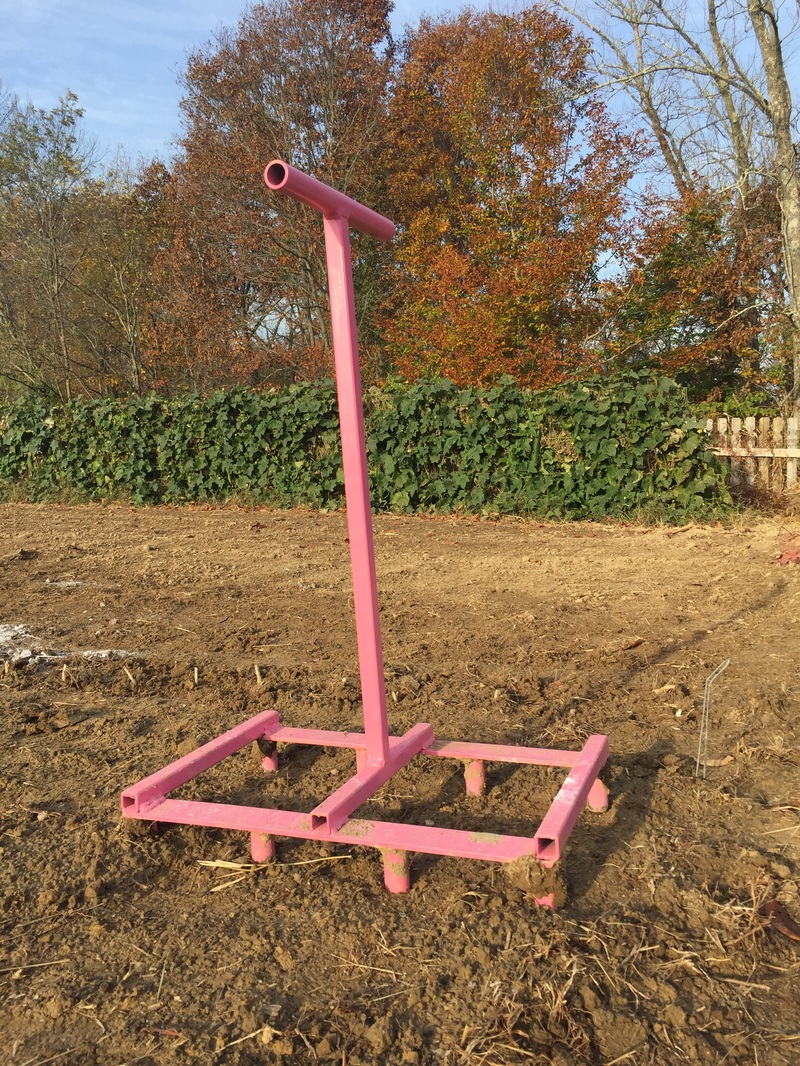 Meet the Pink Lady - she was a great helper in digging the holes for planting this year. After planting, the fish emulsion solution was sprinkled onto the rows, along with a little extra since the nitrogen level in the soil was low. In the spring, feeding will begin early as the bulbs begin to grow. Once done, a light spray of NeemAttack - beneficial nemotodes will go on, and possibly another treatment in the spring. The final step, covering the entire area with a thick layer of clean straw for insulation and weed control. 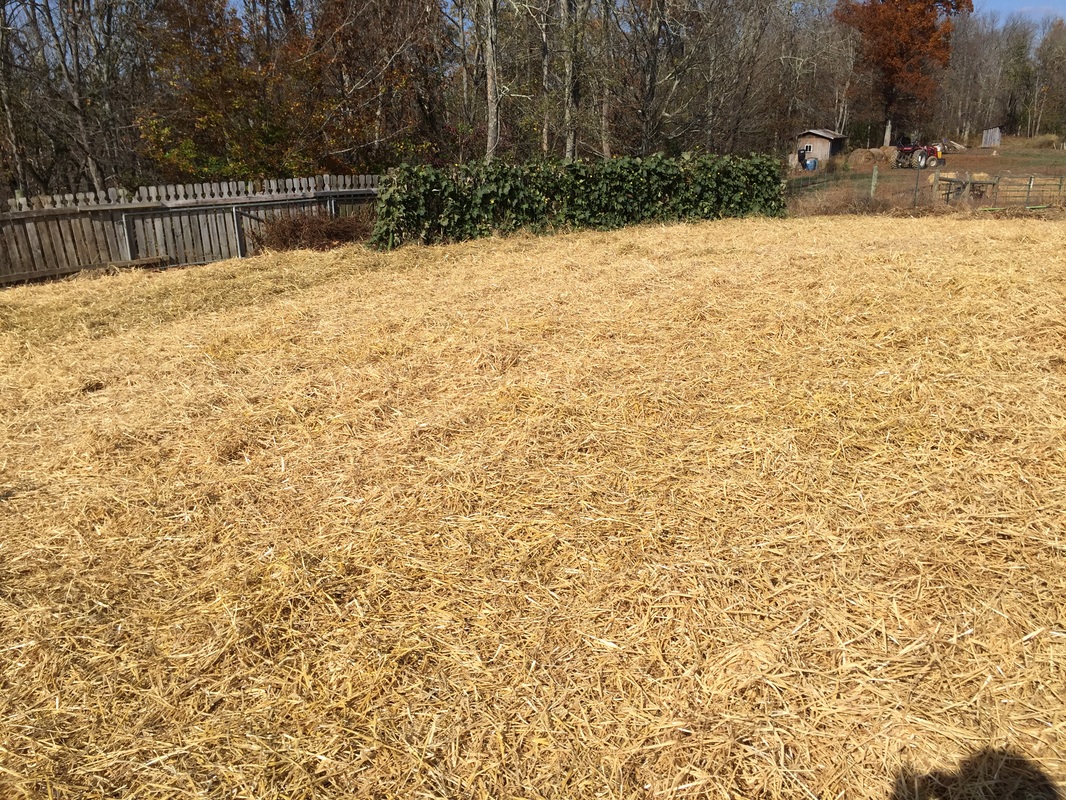 And now we wait.
The chickens have moved into their new home. It has been a gradual process of preparing the inside with nest boxes, plenty of roosting space and insulation of the roof. A few days ago, their food and water was relocated to the new space to introduce them, however, being creatures of habit, they went back to the old building to roost. So, tonight after dark we moved them one by one into the new building and rested them quietly on a roost to sleep. The doors were closed, windows (with screens in) opened for ventilation and plenty of food and water inside. Here they will stay for several days to a week to become accustomed to the new space. I hope it sticks. 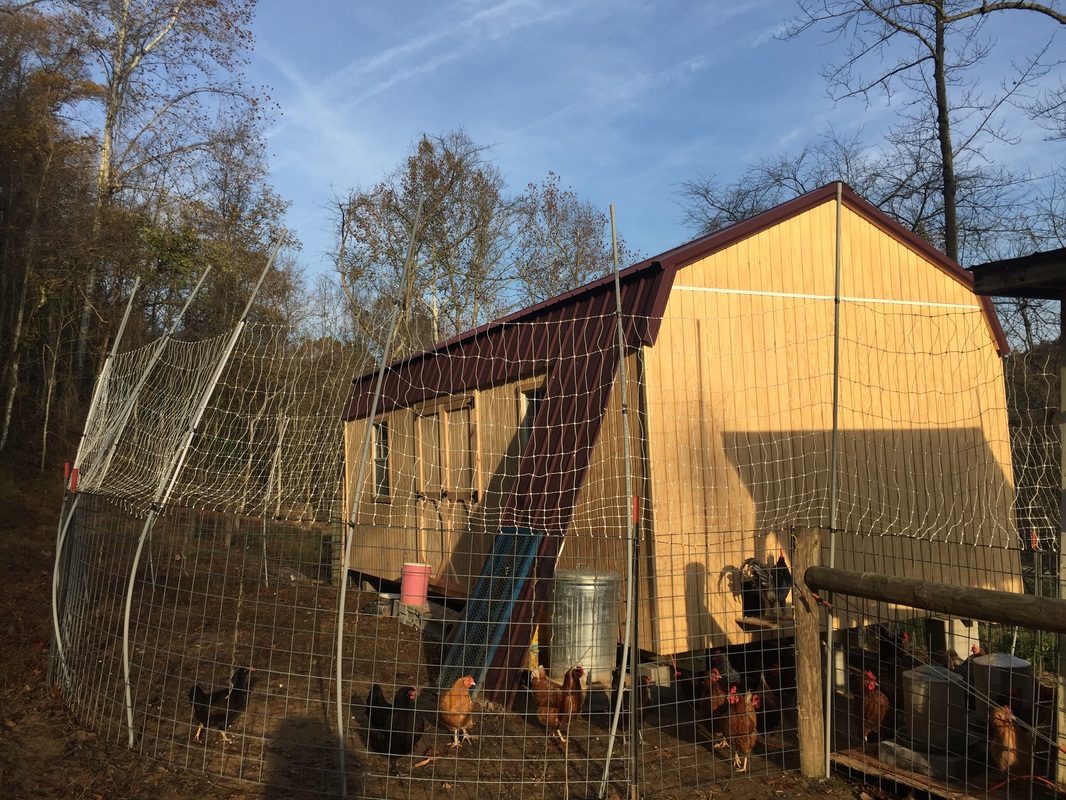 Update: an 8 foot fence surrounds the new coop giving them access to outside but keeping them in the perimeter safe from predators and to continue to learn their new home.
Have you ever wondered where Loofah (also spelled Luffa) comes from? Loofah is a tropical gourd, in the cucumber family. It is also called the dishcloth gourd, and is a unique and versatile plant. I thought it might be cool to make soap with it, so I decided to try growing some this year. The growing cycle is long, about four months, and it grows best in warmer climates. This would be a challenge, but I was not discouraged. I found some seeds on Local Harvest.com, and purchased from a lady in the North east (Rhode island). My thought was, if she can do it in the north, so can I here in southern Ohio. To improve my chances, I planted several seeds in pots around February/March and started them inside. By late April, the plants were growing well and ready to plant. I planted them and several hills of seeds along a 32 foot span of metal fencing panel. After they got started, they grew like wild. To keep them from taking over the garden, I kept wrapping the vines over the fencing to keep it off the ground. 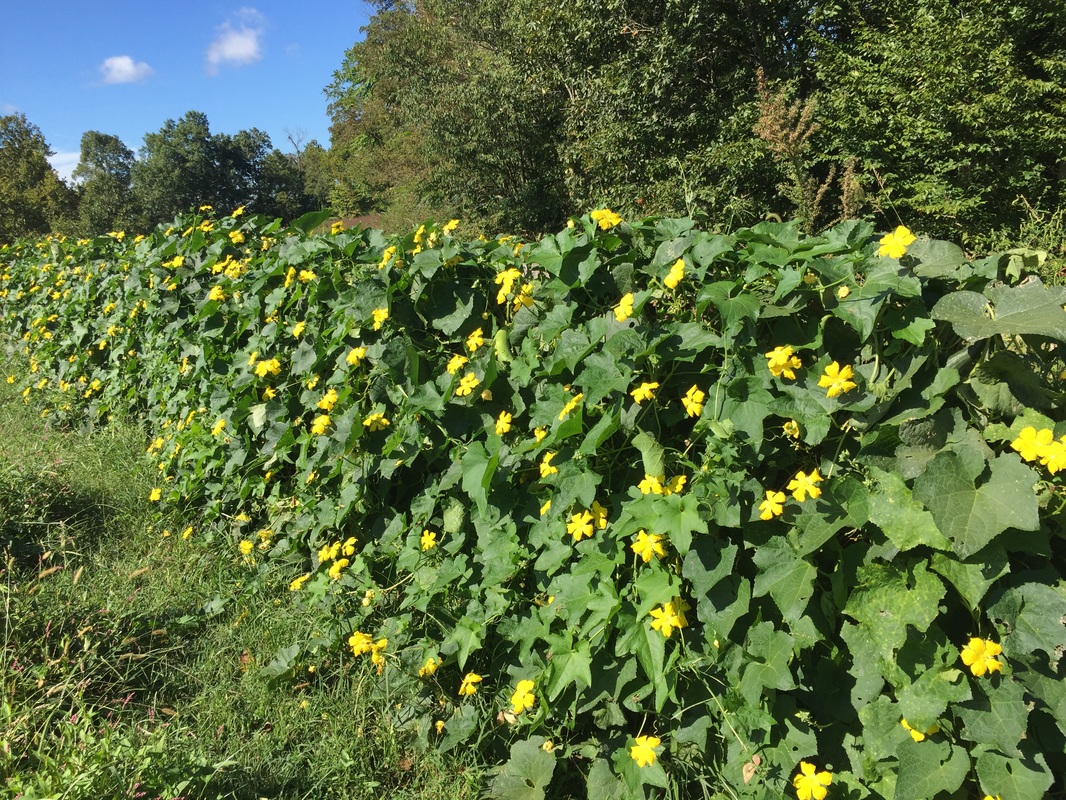 The vines were covered with large, bright yellow flowers, and the honey bees LOVED them.  Eventually, gourds began to slowly appear. As they grew, I was amazed by the size and length. Some were long and straight, and some were curly. Once they started, they kept coming. Now, there's probably at least 100 on the vines. I think I planted a few more than I need.  I've read the young vegetables can be cooked and eaten, but so far I haven't tried it. I also watched a video of a girl peeling the young green skin and blending it up with honey into a facial mask. The goal for sponges is to leave the fruit on the vine as long as possible, until they turn brown and become light and dry. As usual, I was anxious (impatient) and picked one while it was still green. It layed around in the garage for ages, and finally started to turn brown. Unfortunately it got moldy and had to be thrown away. 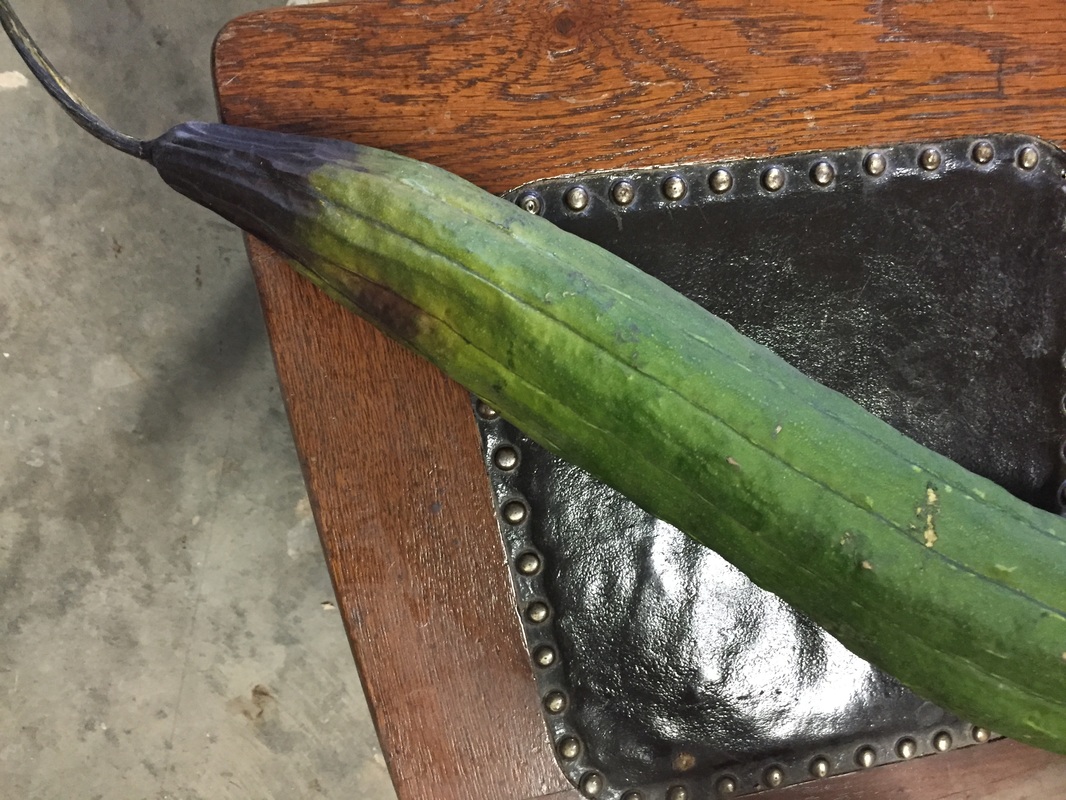 Finally, this week I'm starting to find some that are dry. The gourd felt very light, and the skin was loose, thin, and crinkly like paper. Once peeled, the fibrous sponge is inside. 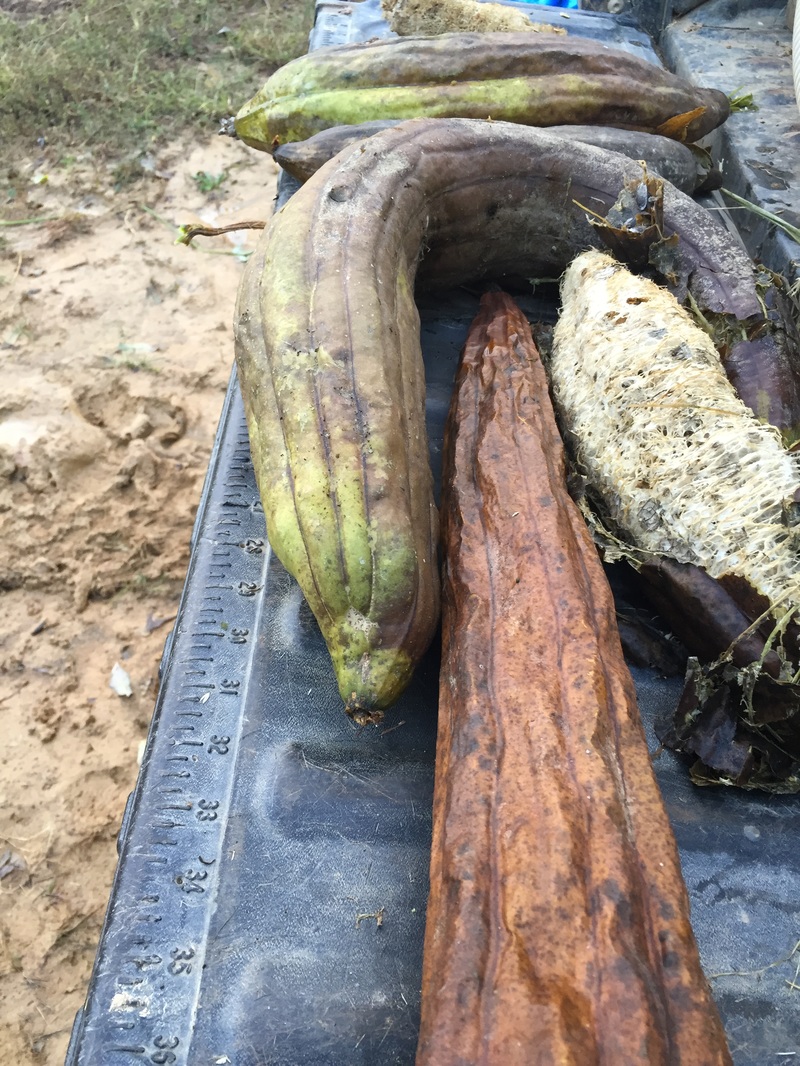 Inside each Loofa are many seeds. If the sponge is dry, they can be shaken out easily into a bucket. I'll be saving these, so if anyone wants some, let me know. 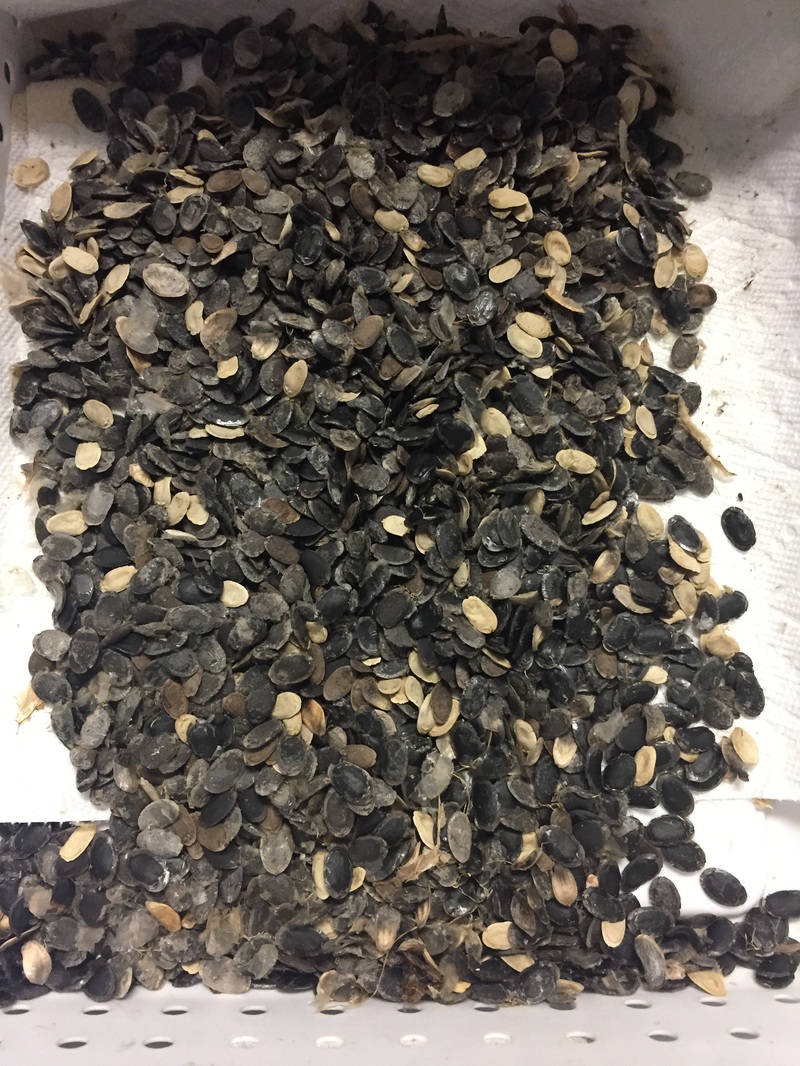 The next step is to clean the sponge. Each one was rinsed thoroughly to remove any pulp, leftover seeds and mildew. Finally, I soaked them for several hours in a bleach solution. You can see more seeds were washed out as I scrubbed them. After a good soak, they were rinsed again with cool clean water. 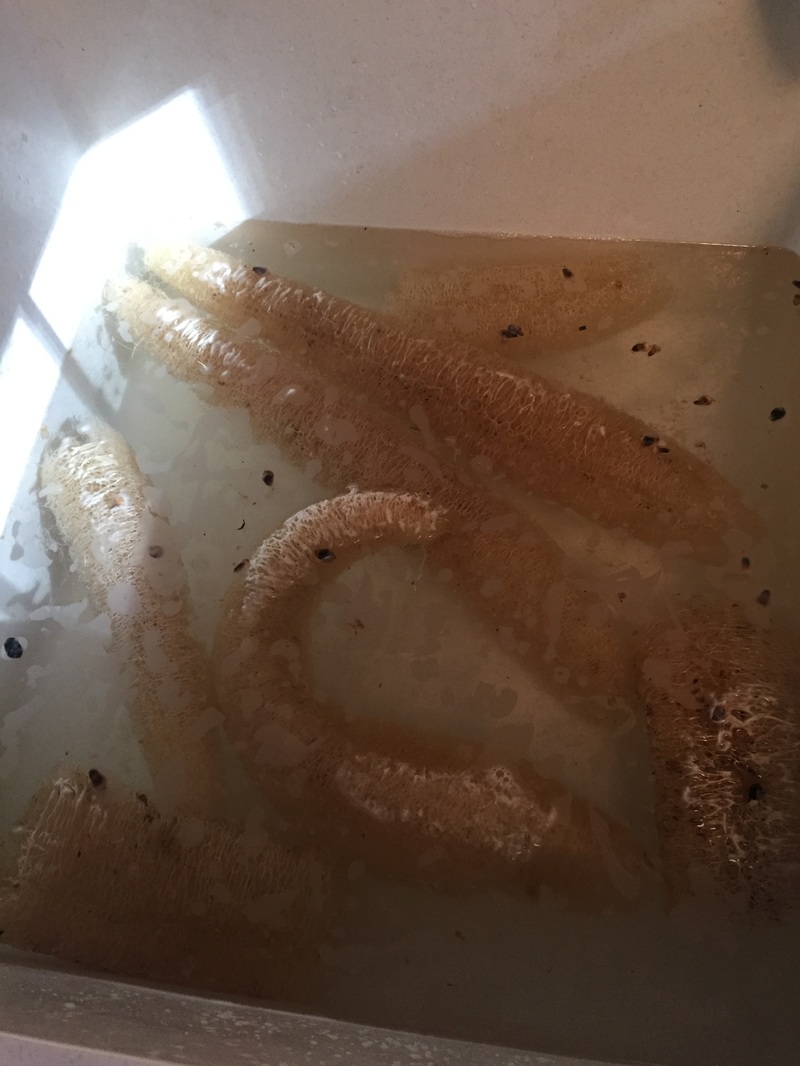 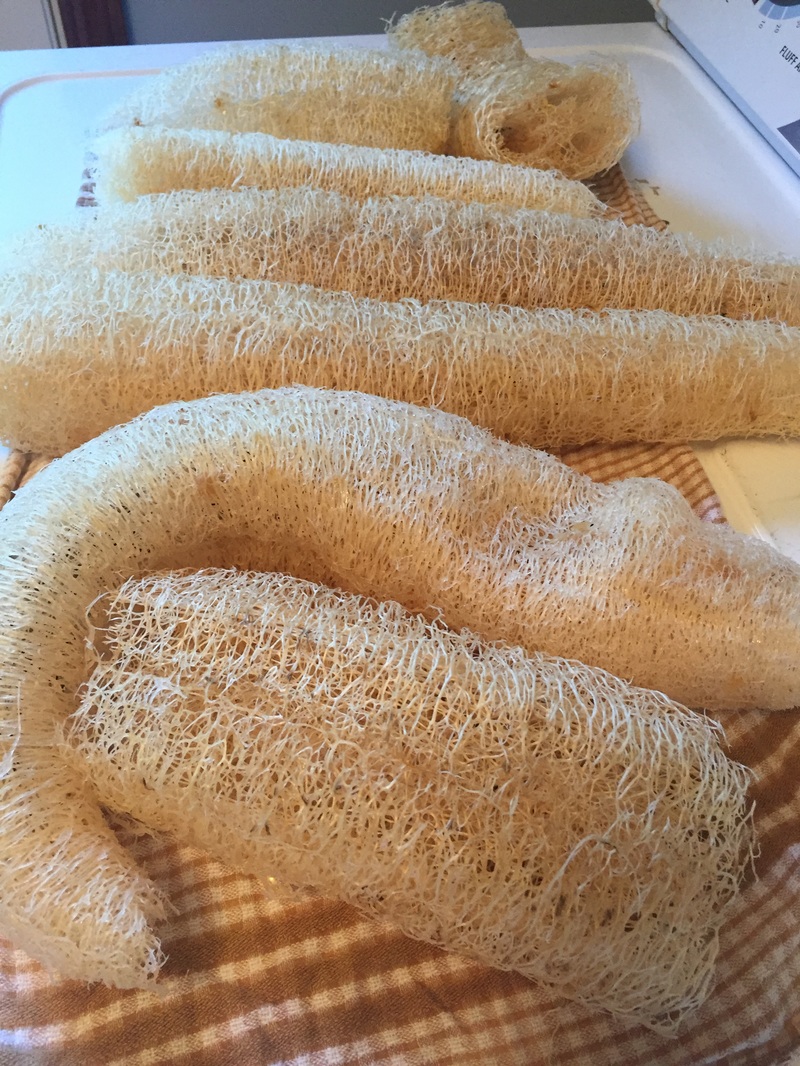 The final result...clean natural sponges, One or two of these will be used in my next soap. I'm also going to try it in the kitchen as a pot scrubber, and in the shower.
If you would like to use one of these in the shower or the kitchen, remember, as with any sponge, to allow it to dry between uses and keep it sanitary. It should be changed frequently, and periodically can be heated up in the microwave or soaked in a bleach solution to eliminate bacteria. And that is where Loofa comes from! I spent a few hours on Friday soaping. Oatmeal, milk and honey is a repeat favorite, and one I'm still trying to perfect. Lemongrass and Tea tree is a new EO combination colored with French green clay, The scent is fresh and invigorating, and will be a creamy luxurious bar. The third was an effort to create a Christmas bar using familiar scents of Pine and Tangerine EO along with red and green clays, and activated charcoal. The pine is very mild and the tangerine is fragrant. A fourth batch, not pictured, is another favorite repeat recipe of the Shaving Bar with Bentonite clay. This time I added a small line of activated charcoal. All of these will be ready after four weeks of curing, just in time for Christmas stocking stuffers. Several varieties are available now on the store page, and for sale at The Wild Ramp and Red Caboose in Huntington. I have one more batch planned, with a special ingredient - Loofah grown here on the farm. More about that soon! Breeding season has officially begun at Tangle Ridge Farm. Alita was ready, and on Saturday took the 0.3 mile hike up the hill to visit Daryl. This will be his first year as herd sire at TRF. Alita is F1 Mini Nubian, and the first goat to come live on the farm. It is because of her that I chose Mini Nubians as my breed of choice. During her time here, she has given me 3 does and 3 bucks, and has proven to be an excellent mother, a good milker, and an all round hardy and friendly goat. Needless to say, she is one of my favorites. I am excited to see what next year brings.  Several end of summer projects are planned and this is one. A 10x12 deck with Pergola is underway.
|
AuthorMy name is Christy Franklin. Archives
February 2021
Categories |


 RSS Feed
